Before setting up accounts for your customers and sending eblasts, you will first need to create a Mailchimp account of your own. This account will make it so you can be added as a user on customer accounts – enabling you to easily access all the accounts you manage from a single login.
Create Your Account
- From mailchimp.com, click “sign up free” in the top right. You are creating a new account on behalf of your customer
- Fill out the form using your Q4Launch email address. Your username can be the same email and your password is whatever you’d like (so long as it is secure!).
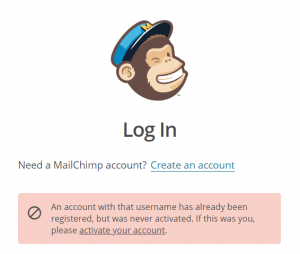 Go back to the sign in page and log in with the account credentials. There will be a red box error message – choose the link to activate the account.
- Work through each step to finish setting up the account. This should be your work info.
- You can skip most options/details that are not relevant or required, as this account will only be used to access customer accounts. It will not be used to send any eblasts itself.
- Don’t connect social media.
- Don’t sign up for the newsletter.
- Once complete, you can log out and follow the steps to create accounts for your customers, or you can have your user account added as a manager on existing customer accounts (just ask someone already on the account to add you, such as the current CEM or a team lead).
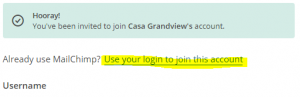
- When you are invited to join customer MailChimp accounts, go to your email inbox, find the MC email, and click “Join This Account”. Make sure you select “User your login to join this account” instead of creating a new login.