Table of Contents:
- Creating a New Google Analytics Account
- How to Add a Google Analytics Admin User
- Setting Up the Google Analytics Settings for Best Practices
- How to Setup Ecommerce Tracking in Google Analytics
- Setting Up Custom Alerts (alerting for site performance issues)
- Setting Up the Vacation Guide Goal tracking
Creating a New Google Analytics Account
- Navigate to https://analytics.google.com/ and log in (if necessary). Once logged in, you should be taken to the Dashboard for an Analytics account that you currently have access to.
- In the bottom left-hand corner, click “Admin”.
- Above the Account column, click the “+ Create Account” button.
- Enter the customer’s name (ex. Launch Bed and Breakfast) for the “Account name (Required)” field.
- Check the box next to Google products & services, Benchmarking, Technical support, and Account specialists.
- Click Next
- Enter the customer’s name (ex. Launch Bed and Breakfast) for the “Property name” field.
- Choose the correct timezone for the customer for “Reporting Time Zone” and the correct currency for “Currency.”
- Click “Show advanced options” and toggle on “Create a Universal Analytics property.”
- For “Website URL,” enter the customer’s URL exactly as it appears in the search bar when accessing the customer’s website (ex. www.LaunchBedAndBreakfast.com if it has the “www.” or LaunchBedAndBreafkast.com if it does not have the “www.”).
- Select “Create a Universal Analytics property only” and click Next.
- Choose the industry that best fits your customer for the “Industry category” (this would be Travel or Real Estate for most of our customers), select the “Business Size” that best fits your customer, and check every box under “How do you intend to use Google Analytics with your business? (Check all that apply)” except Other.
- In the pop-up that appears, check the boxes for “I also accept the Data Processing Terms as required by GDPR” and “I accept the Measurement Controller-Controller Data Protection Terms for the data that I share with Google.” Then, click the “I Accept” button at the bottom.
- After the page refreshes and your Analytics account is created, on the left side of the screen, click the left-pointing arrow and proceed to the below section to add users to this new Analytics account.
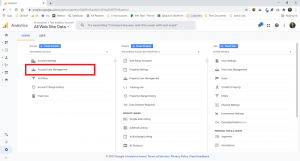
How to Add a Google Analytics Admin User
- Navigate to https://analytics.google.com/ and sign in to the Google account that has access to the Analytics account that you’re adding a user to, if necessary.
- On the left-hand side of your screen, click “Admin”:
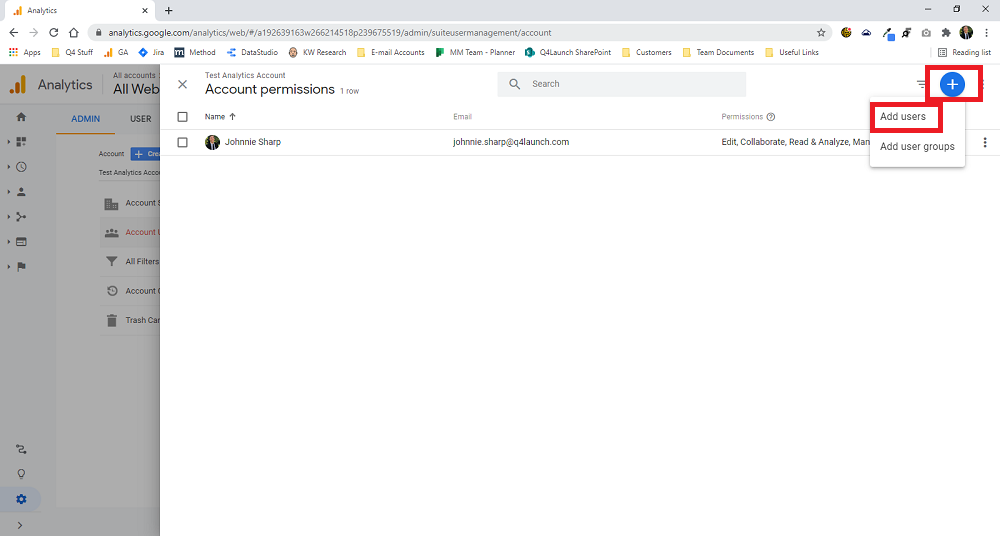
- Under the Account column, click “Account User Management”.
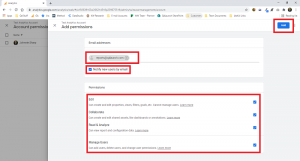
- Click the “+” button in the top right-hand corner and click “Add User”.
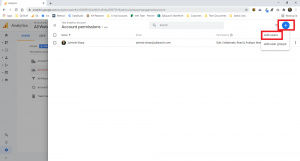
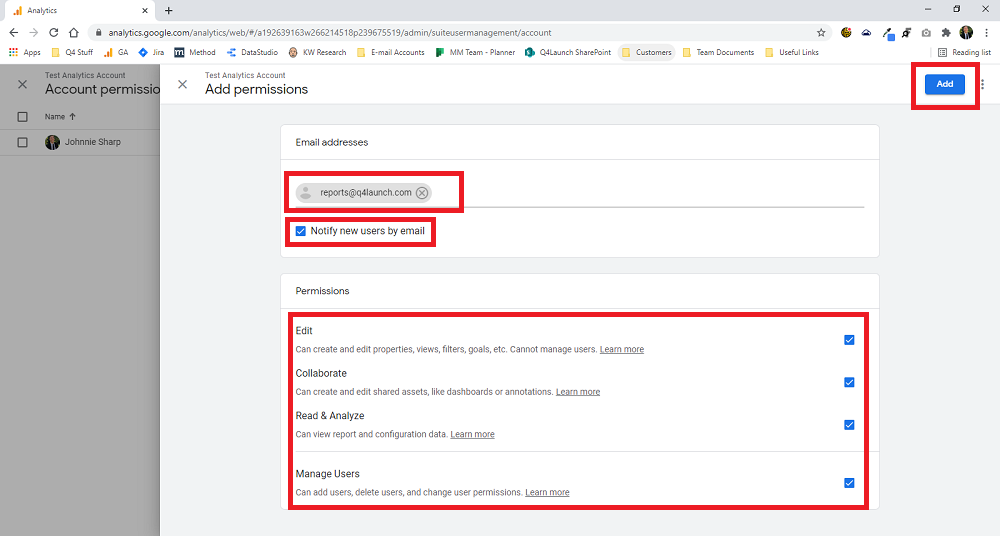
- Enter the email address of the Gmail account you’d like to add to the Google Analytics account, select Notify new users by email to send a notification to each user you’re adding. Then, check the box next to Edit, Collaborate, Read & Analyze, and Manage Users (please note that the selected permissions may be different depending on who you are giving access to). Then, click Add in the top right-hand corner.
- Please note that you will want to add each member of the customer’s dedicated Q4Launch team (i.e. the CSM, MM, SEO team, Reports@q4launch.com/Reports2@q4launch.com, etc.) as well as the customer(s).
- Please note that only Gmail accounts can be given Google Analytics access, so the customer may need to create a Gmail account if they don’t already have one.


Setting Up the Google Analytics Settings for Best Practices
- Navigate to https://analytics.google.com/ and log in (if necessary). Once logged in, you should be taken to the Dashboard for an Analytics account that you currently have access to.
- In the top left-hand corner, click the name of the account you are currently viewing to open up the list of accounts you have access to, and select the Account>Property>View that you are setting up/confirming the Analytics settings for.
- In the bottom left-hand corner, click “Admin”.
- Under the Account column:
- Click “Account Settings” and confirm that the box is checked for Google products & services, Benchmarking, Technical support, and Account specialists.
- If the box next to “Give all Google sales experts access to your data and account, so you can get more in depth analysis, insights, and recommendations across Google products.” is checked, leave it checked. If the box is unchecked, do not check it.
- Click the Save at the bottom of the page. After the “Success.” pop-up appears at the top of the page.
- Click “Account User Management” and review the list of current users.
- If any Q4Launch team members that need access do not have access, please grant them access by following these steps.
- If there are any e-mail addresses that you do not recognize (i.e. past marketing company e-mail addresses), reach out to the customer to ask if we have permission to remove their access. Please note that customers that are marketing only customers may grant members of their website company’s team access to their Analytics account.
- Click the left-facing arrow on the left-hand side of the screen.
- Click “Account Settings” and confirm that the box is checked for Google products & services, Benchmarking, Technical support, and Account specialists.
- Under the Property column:
- Click “Property Settings,” confirm the customer’s Default URL is correct, confirm the correct Industry is selected, and make sure both “Enable Demographics and Interest Reports” and “Enable Users Metric in Reporting” are On. Click the Save button at the bottom of the page and wait for the “Success” pop-up at the top of the page.
- Click “Tracking Info”, click “Data Collection,” and then Turn On “Remarketing” and “Advertising Reporting Features.” Click the Save button at the bottom of the page and wait for the “Success” pop-up at the top of the page.
- Click “Referral Exclusion List.” Click the “+Add Referral Exclusion” button, type in the booking engine URL (ex. secure.thinkreservations.com), and click “Create.” Then, if necessary, click the “+Add Referral Exclusion” button and type in the domain of the customer’s URL (ex. LaunchBedAndBreakfast.com), and click “Create.” Then, click the Save button at the bottom of the page and wait for the “Success” pop-up at the top of the page.
- Click the left-facing arrow on the left-hand side of the screen.
- Under the View column:
- Click “View Settings,” make sure the customer’s Website URL is correct, confirm the Time Zone is correct for this customer (ex. Los Angeles for a customer in California), confirm the currency is correct, and make sure the box next to “Exclude all hits from known bots and spiders” is checked. Then, copy and paste the below in to the box for “Exclude URL Query Parameters” and click the Save button at the bottom of the page, and wait for the “Success” pop-up at the top of the page.
- mc_cid, mc_eid, fbclid, vgo_ee
- Click “View Settings,” make sure the customer’s Website URL is correct, confirm the Time Zone is correct for this customer (ex. Los Angeles for a customer in California), confirm the currency is correct, and make sure the box next to “Exclude all hits from known bots and spiders” is checked. Then, copy and paste the below in to the box for “Exclude URL Query Parameters” and click the Save button at the bottom of the page, and wait for the “Success” pop-up at the top of the page.
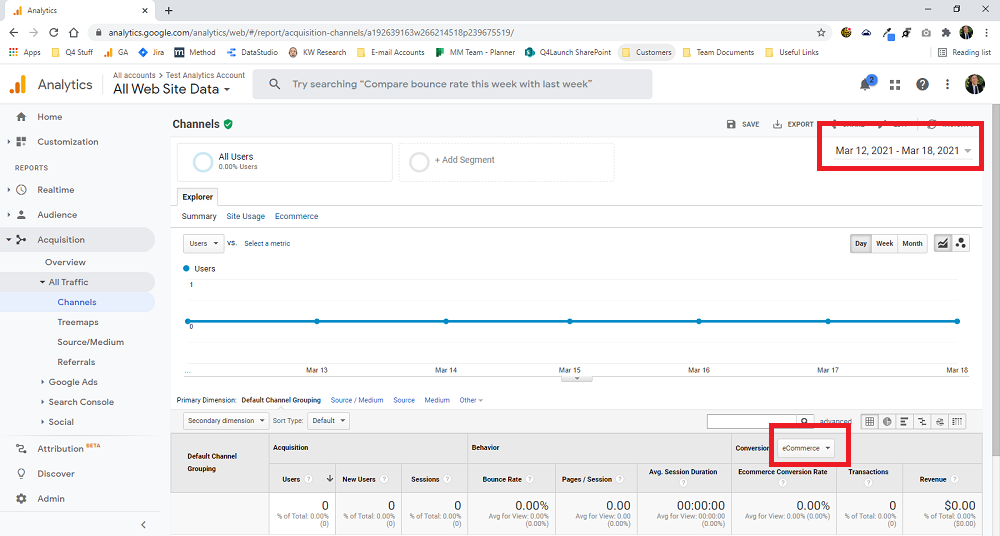
How to Setup Ecommerce Tracking in Google Analytics
- Navigate to https://analytics.google.com/ and log in (if necessary). Once logged in, you should be taken to the Dashboard for an Analytics account that you currently have access to.
- In the top left-hand corner, click the name of the account you are currently viewing to open up the list of accounts you have access to, and select the Account>Property>View that you are setting up/confirming the Ecommerce Settings for.
- In the bottom left-hand corner, click “Admin”.
- Under the View column, select “Ecommerce Settings.”
- Turn On “Enable Ecommerce” and turn on “Enable Enhanced Ecommerce Reporting.”
- Click the Save button at the bottom of the page, and wait for the “Success” pop-up at the top of the page.
- For HIL/B&B customers, you’ll also want to confirm the settings in the customer’s Booking Engine are also set up correctly for Google Analytics Ecommerce Tracking by referencing this Knowledge Base Article.
- If we do not have access to the Booking Engine login, the customer may need to assist with this step.
- If you do not see your customer’s Booking Engine in the above-linked Knowledge Base Article, please reach out to another CSM or MM on the team for further assistance and guidance.
Setting Up Custom Alerts (alerting for site performance issues)
- Navigate to https://analytics.google.com/ and log in (if necessary). Once logged in, you should be taken to the Dashboard for an Analytics account that you currently have access to.
- In the top left-hand corner, click the name of the account you are currently viewing to open up the list of accounts you have access to, and select the Account>Property>View that you are setting up Custom Alerts for.
- In the bottom left-hand corner, click “Admin”.
- Under the View column, scroll down and click “Custom Alerts”
- Click the red “+New Alert” button and be sure to check the box for “Send me an email when this alert triggers.” when creating each of the following alerts:
- Alert Name: eCommerce Conversion
- Period: Month
- Applies to: All Traffic
- Alert me when: Ecommerce Conversion Rate
- Condition: Is less than
- Value: 0.005
- Alert Name: VG Conversion
- Period: Month
- Applies to: All Traffic
- Alert me when: Vacation Guide Conversion Rate
- Condition: Is less than
- Value: 0.01
- Alert Name: YOY Traffic Growth
- Period: Month
- Applies to: All Traffic
- Alert me when: Sessions
- Condition: % decreases by more than
- Value: 15%
- Compared to: Same month in the previous year)
- Alert Name: AdWords Traffic (if applicable)
- Period: Week
- Applies to: Medium
- Condition: Matches exaction
- Value: cpc
- Alert me when: Sessions
- Condition: % decreases by more than
- Value: 30%
- Compared to: Previous week
- Alert Name: AdWords Conversion (if applicable)
- Period: Month
- Applies to: Medium
- Condition: Matches exaction
- Value: cpc
- Alert me when: Ecommerce Conversion Rate
- Condition: Is less than
- Value: 0.007
- Alert Name: eCommerce Conversion
Setting Up the Vacation Guide Goal tracking
- Navigate to https://analytics.google.com/ and log in (if necessary). Once logged in, you should be taken to the Dashboard for an Analytics account that you currently have access to.
- In the top left-hand corner, click the name of the account you are currently viewing to open up the list of accounts you have access to, and select the Account>Property>View that you are setting up the Vacation Guide Goal Tracking for.
- In the bottom left-hand corner, click “Admin”.
- Under the View column, click “Goals.”
- Click the “+ New Goal” button.
- Select “Custom” and click the “Continue” button at the bottom of the page.
- For “Name,” put “Vacation Guide Signups,” and select “Destination.” Then, click the “Continue” button at the bottom of the page.
- For “Destination,” select “Begins with” and type in /thank-you/
- Turn on “Funnel,” input “Request page” for “Name,” and the slug for the request page of the customer’s website (ex. /request-our-Charleston-vacation-guide/). Then, click the “Save” button at the bottom of the page.
- Complete a test submission of the Vacation Guide request form on the customer’s website, and confirm that this Goal tracked the submission by going to Acquisition>All Traffic>Channels, selecting the date of the test submission in the top-right hand corner of the page, and selecting the Vacation Guide Signups goal from the drop-down on the right-hand side of the page.