
Re-engagement campaigns are a great way to win back lost subscribers. A re-engagement campaign is a sequence of emails sent to inactive subscribers. The goal of a re-engagement email is to get people to interact with your emails.
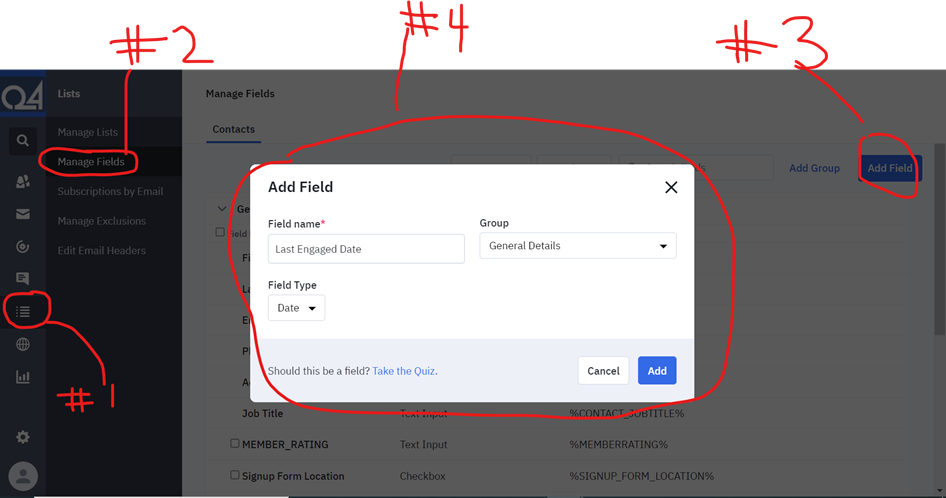
Step 1: Create a Custom Contact Field “Last Engaged Date”
We need to create a “Contact Field” that we will use in our automation. Here are the steps:
Open your client’s ActiveCampaign Account → Click “Lists” on the Dashboard to the left of your screen → Click “Manage Fields” → Click “Add Field” → Name the field “Last Engaged Date” → Group “General Details” → Field Type “Date → Add.”
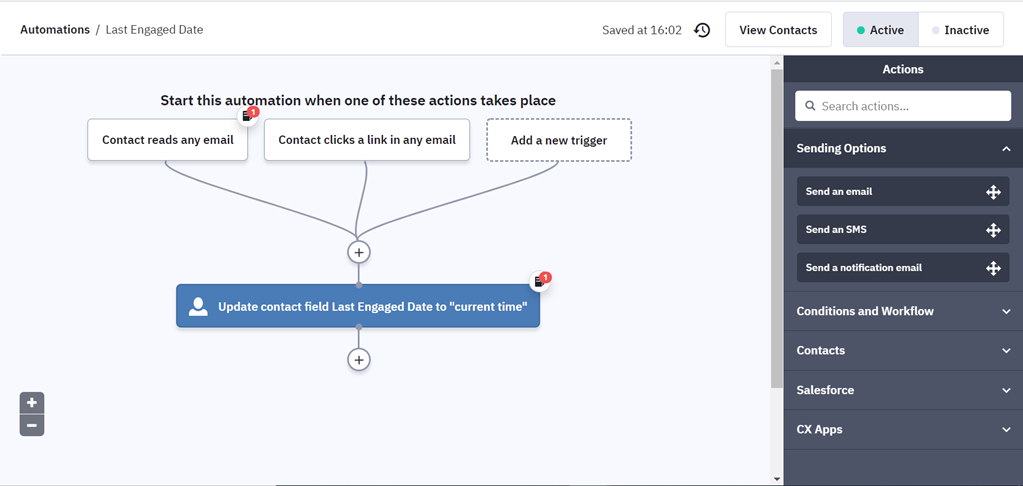
Step 2: Import ActiveCampaign’s Contact Last Engaged Date Automation Recipe
Follow this link and follow their directions to import the first required automation for the reengagement campaign. This will need to be active to move forward with the rest of the campaign.
- The Automation Setup Wizard will instruct you to use a date-based custom field and set the dropdown to “current time” for the automation to work. You can name the custom field something like Last Engaged Date or whatever you prefer for segmenting.
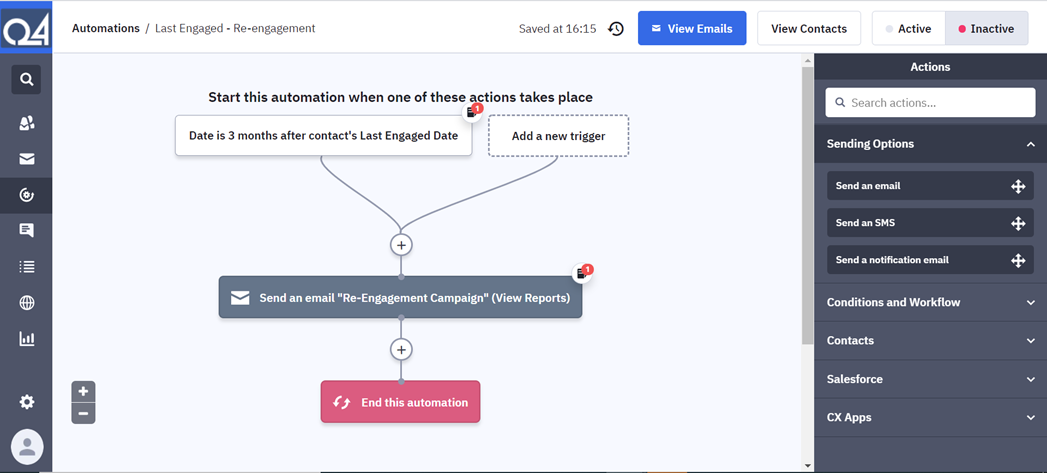
Step 3: Import ActiveCampaign’s Re-Engagement Campaign Recipe
You can import ActiveCampaign’s templated automation to get you started. Just follow the link here and the instructions that ActiveCampaign provides.
- ActiveCampaign will prompt you to log in and select “import” when creating a new automation. Then, paste this URL into the input field when prompted: https://tplshare.com/fS8S69s.
- The Automation Setup Wizard will help instruct you further to make sure you are selecting the correct fields for this automation.
- Choose the field “Last Engaged Date” from the automation of the same name. If you don’t have that automation built yet, go do so now and the import will pick up here when you return.
- Your automation should look like this at this point:
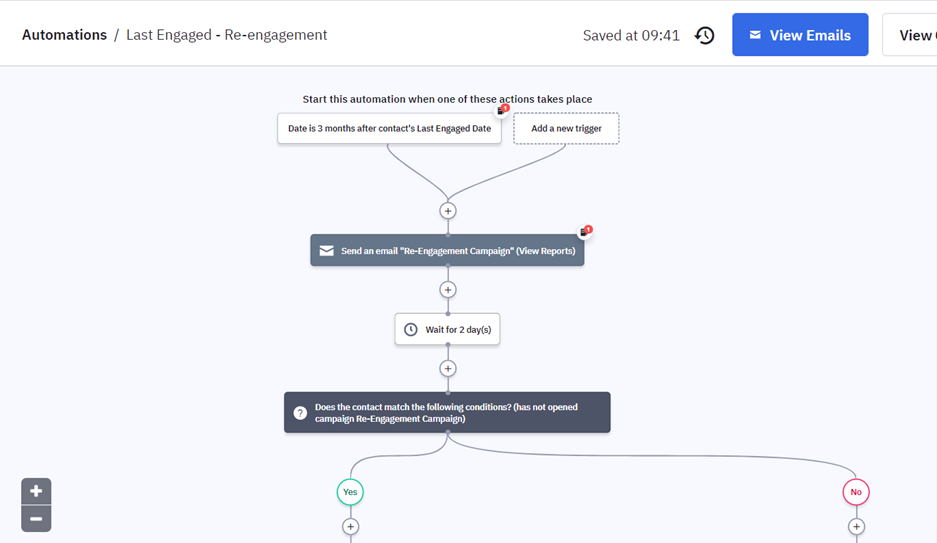
Step 4: Set up the Rest of the Automation
- We will need to create three more emails for this automation (totaling four emails)
- The triggers between each email are as follows:
- After Email 1
- Wait for 2 days
- Set Condition: contact has not opened previous email (Re-Engagement Campaign Email 1)
- If Yes, send Email 2.
- If No, add Tag “Successfully Re-Engaged: Re-Engagement Campaign” and end this automation.
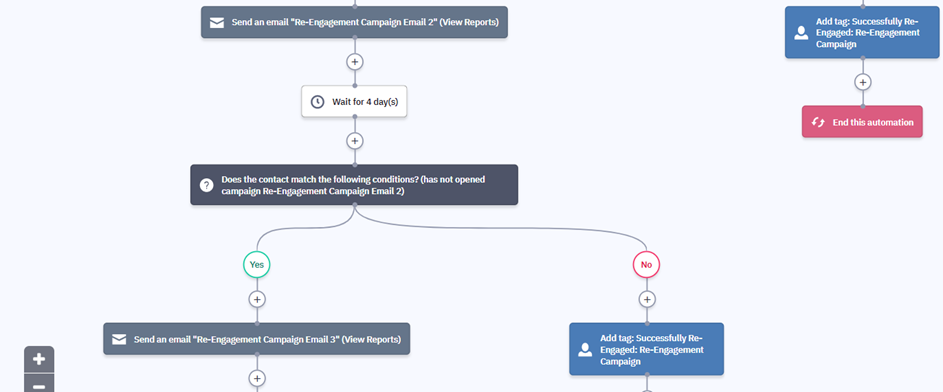
- After Email 2
- Wait for 4 days
- Set Condition: Contact has not opened previous email (Re-Engagement Campaign Email 2)
- If Yes, send Email 3.
- If No, add Tag “Successfully Re-Engaged: Re-Engagement Campaign” and end this automation.
- After Email 3
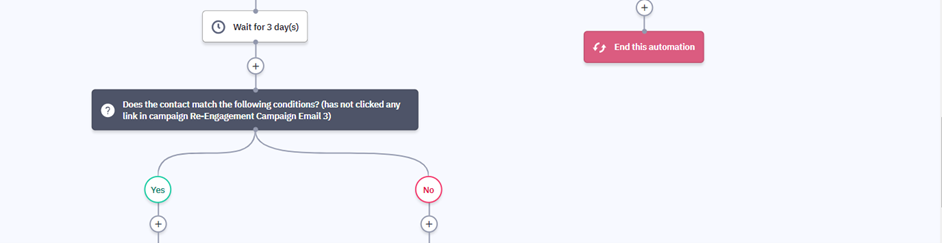
- Wait for 3 days
- Set Condition: Contact has not clicked any link in previous email (Re-Engagement Campaign Email 3)
- If Yes, unsubscribe contact, add tag “Unsubscribed: Re-Engagement Campaign,” and send email 4.
- If No, add Tag “Successfully Re-Engaged: Re-Engagement Campaign” and end this automation.
- We will need to add an action that unsubscribes the contact if they have not clicked on any links or engaged with the emails in this automation. Here are the steps:
- Add New Action → Conditions and Workflow → If/Else → Select Condition: Actions: Has Not Clicked on Link (Any Campaign/Any Link)
- Add New Action After Yes for “Does the Contact Match the Following Conditions (Has Not Clicked on Link) → Contacts → Unsubscribe → Select Main Contact List
- After “Unsubscribe from the List” Send Email 4
- End Automation After Email 4 and “No” for “Does the Contact Match the Following Conditions (Has Not Clicked on Link)
- Your automation should look like this when you’re finished:

Step 5: Create Content for All Four Emails Using Our Template
- Begin building your emails for this automation using this template:
- Re-Engagement Campaign Email Templates
- Feel free to tweak these as needed for your client.
- For Email 2, you have three options (Special Offer, Facebook, or Lead Gen Focus)
- Name the campaigns “Re-Engagement Campaign,” “Re-Engagement Campaign 2,” “Re-Engagement Campaign 3,” and “Re-Engagement Campaign 4.”
- Send tests of all four campaigns to the CSM and MM on the account. Then, they will send these emails to the client for their approval before we activate this automation.
- Upon the client’s approval, it will be the MM’s responsibility to “activate” the automation.