
- Make sure you see the Mission Control Task bar at the top of the screen. If you don’t see the task bar, click the “9 circles” icon on the top left of the screen, type “Mission Control”, click on the “Mission Control” app in the drop down menu.
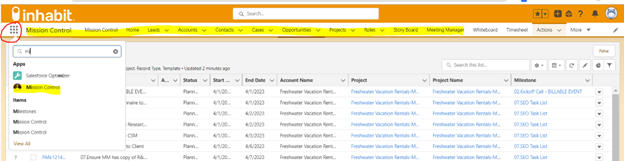
- In the Mission Control task bar, click on the “Actions” tab (click the word “Action” not the arrow next to it). If “Actions” isn’t in the task bar, click “More” in task bar and “Action” should appear in the drop down menu.

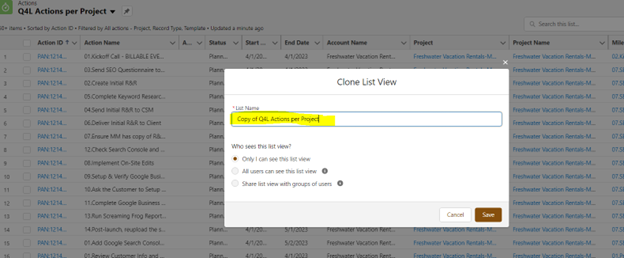
- You should see the “Q4L Actions Per Project” view. If you see a different view, click the drop down arrow next to the view’s name. Click on “Q4L Actions per Project”. Then, click the drop down arrow on the Settings icon on the top right of the screen. Click “Clone” from the drop down menu.

- Update the “List Name” with something that includes your name. Click “Save”.
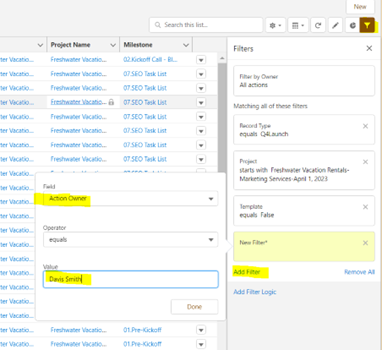
- Once the new View loads, click on the “Filters” icon on the top right.

- Under the Filters icon menu
- Click “Add Filter”
- In the “Field” field–select “Action Owner” from the drop down menu
- In the “Value” field–enter your name (make sure it’s an exact match for how your name appears in Salesforce)
- Click “Done”
-
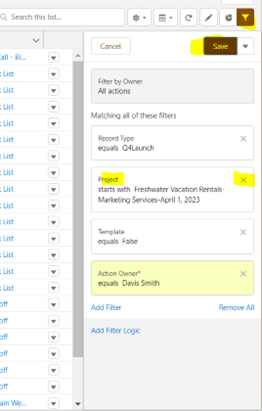
- Remove the “Project” filter by clicking on the “X” in the top right corner of that section. Click “Save” to update the filter settings.
7. If you want this view to be filtered to only show certain Actions based on their status.
-
- Click “Add Filter”
- In the “Field” field– select the second “Status” from the drop down menu
- Make sure “Operator” field says “Equal”
- In the “Value” field– select the Statuses you want to show on the view (can select multiple statuses)
- Click “Done” & “Save” to update settings.
