Q4Flash is a stand-alone product offered by Q4Launch that allows customers to quickly discount and sell inventory during a short duration to prompt impulse buying.
Current fee: No setup fee, 20% commission on gross sales, Stripe fee comes out of our commission. There is a $500 cancellation fee to compensate for our work IF the customer cancels during the setup process.
Overview and Order of Events:
- One-week turnaround from the time the customer agrees and provides the sale info.
- Must enforce a 12 p.m. deadline the day before launch for any final changes from the customer.
Step 1: CSM reaches out to the customer for details on the sale (what we are offering, cost, fine print, etc.)
Step 2: CSM puts an issue in Jira to build the page (Dev needs to install four plug-ins and create the page)
Step 3: CC takes information from the client and tweaks it for direct response.
Step 4: CSM inputs CC’s marketing language into the page (including formatting).
Step 5: CC creates emails in ActiveCampaign and Facebook posts pre-launch.
Step 6: CSM informs Tom to put it on PPC.
Step 7: CSM creates an Icegram popup when the sale goes live.
Step 8: CSM asks DEV to move the Stripe Payment Gateway from Test API Creds to the Live API Creds.
*Note: Steps 4-6 are not in any particular order and need to be done all around the same time.
Initial Setup Request
CSM — Once a customer is ready to use Q4Flash🗲, please open a task in Jira to request the product be installed by Dev.
- Task Title: Install Q4Flash Plugin
- Description: Please install Q4 Flash plugin to the live/dev website at: provide-your-customer-URL.com/flash-sales/
Dev Setup
There are 4 plugins that need to be installed:
- Woocommerce
- WooCommerce Stripe Payment Gateway
- WooCommerce Google Analytics Integration
- Q4 Flash Sale
Once installed:
- Import Default WC Settings (TBD)
- Stripe Test Creds: Set up the Stripe Payment Gateway with Test API Keys and Webhook
- Stripe Live Creds: Once ready to go live, update with Stripe Payment Gateway with Live API Keys and Webhook
CSM Setup
- CSM reaches out to the customer for details on the sale. We need:
- Complete, clear details about their offer, including the cost, fine print, etc.
- A description of the type of travelers/guests who would be interested in this offer. (Ie: Couples who want a romantic getaway; families looking for a great deal; people who have never visited before.)
- A few comments in their words about why they think this offer should be irresistible.
Collect all of the above into one document or email and share w/ the CC.
- CSM puts a ticket in for Rich to install the necessary plugins (these will create the necessary pages by default)
- CC takes information from client and turns it into marketing language. (SEE THE HOW-TO BELOW)
- CSM inputs CC’s marketing language into the Flash Sale page and the WooCommerce Product page (instructions to follow).
- CC creates emails and social posts pre-launch
- CSM informs Tom to put it on PPC
- CSM creates Icegram popup when the sale goes live.
*note: Steps 4-6 are not in any particular order and need to be done all around the same time.
WooCommerce Setup Instructions
WooCommerce > Settings
- General tab
Address: Q4Launch’s info, not the customer’s.
Uncheck “Enable the use of coupon codes” - Accounts & Privacy tab
Check “Allow customers to place orders without an account”
Make sure “Allow customers to create an account during checkout” and “on the My Account page” are both unchecked. - Emails tab
“Processing Order” is the one that the customer receives after checkout. To be safe, make sure “Completed Order” has the same copy since we’re still working out when that one sends.
“New Order,” “Cancelled Order,” and “Failed Order” go to the customer to alert them to changes in an order’s status. Make sure the CSM, Stephen, and Keegan are included as well as the customer for the time being. - Email Sender Options
From name should be the name of the business, e.g. “Inn and Spa at Cedar Falls”
From address should be the primary business address, e.g. info@. - Integrations tab
Once the WooCommerce Google Analytics integration is installed, paste in the customer’s Analytics ID, check “Enable Standard Tracking,” “Enable Universal Analytics,” and every checkbox after that.
Products
- Add New – title it the name of the sale, e.g. “Winter Flash Sale”
Leave the body copy empty. Set a Product Image though (just a room or a shot of the property) – this will be used as the thumbnail during checkout. - In the Product Data section, select “Variable Product” from the drop-down if the customer is offering several choices in the sale. Select “Simple Product” if they’re only offering one option.
Under “Inventory” don’t worry about the SKU for now – just leave it as 1.
Uncheck the “Enable stock management” unless you want to set a limit on how many can be purchased in total. If the customer wants to limit how many vouchers can be purchased in a single order to just one, check the “Sold individually” box (probably won’t be used). - In the Attributes section, select “Custom product attribute” and click “Add”. Name it “title” and set the values as the individual option names that will be available, e.g. “Option 1 | Option 2 | Option 3” if you have three voucher options to choose from.
Values must be separated by the | character.
Check the boxes for “Visible on the product page” and “Used for variations.” - In the Variations section, click “Add variation” for as many options as are being offered, and select the values that you entered in the previous step in the drop-down (e.g. Option 1, Option 2).
These fields expand if you click on them (it’s not obvious that you can) and this is where you put the information on the regular and sale prices, the Description, and check the box for Enabled and Virtual, since we’re not sending a physical product. Repeat for all options/variants.
Make sure Q4Flash Sale and Uncategorized are both checked in the “Product categories” section, with Q4Flash Sale set as the primary. - Save.
Yoast SEO Settings
WooCommerce creates numerous product/product category index pages by default, but we don’t want these to show in search engines. Only the Flash Sale itself should be indexed. Thankfully, these can easily be changed.
- Go to SEO > Search Appearance > Content Types tab
- Expand Products and set “Show Products in search results?” to No
- Expand Flash Sales, scroll down to the “Settings for Flash Sales archive” section, and set “Show the archive for Flash Sales in search results?” to No.
- Click “Save Changes”
- Click the Taxonomies tab
- Expand Product categories” and set “Show Product categories in search results” to No
- Expand Product tags” and set “Show Product tags in search results” to No
- Expand Product shipping classes” and set “Show Product shipping classes in search results” to No
- Click “Save Changes”
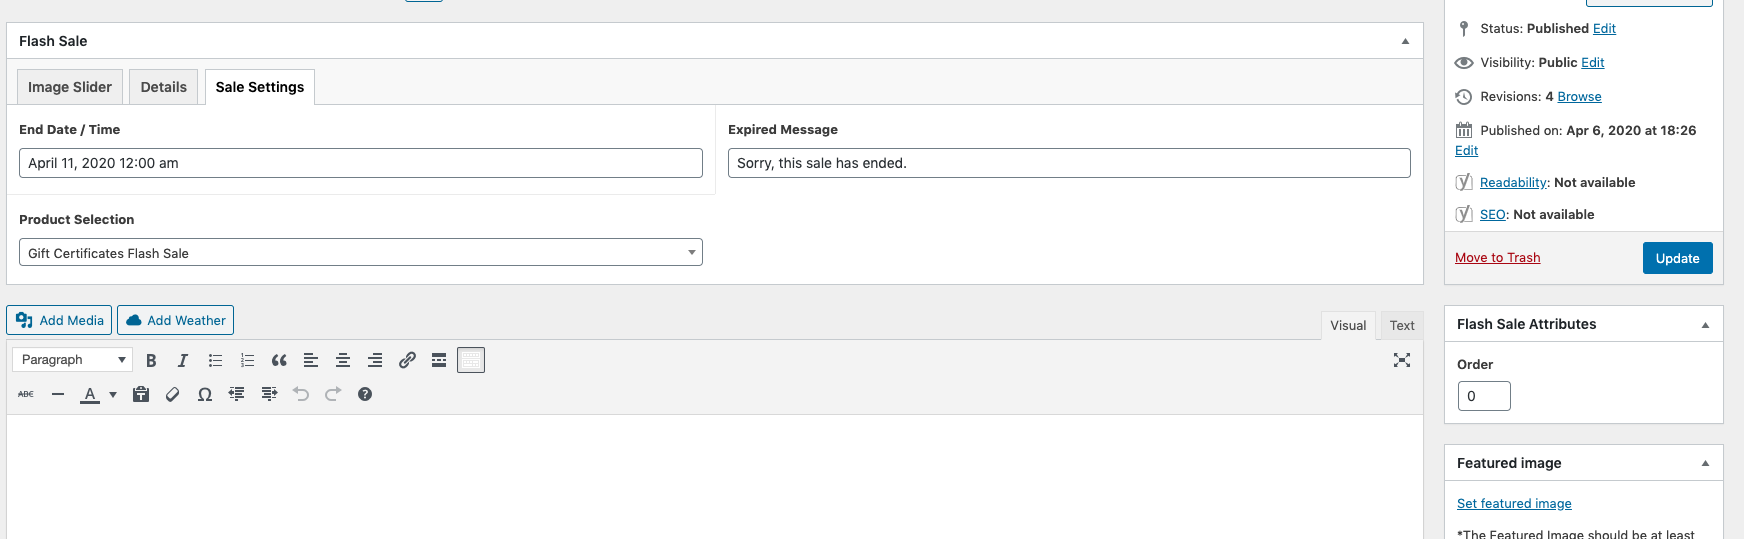
Flash Sale
- Create a new flash sale. Set the title as what you want to appear as the page heading, e.g. “Save Up to 30% on Cottages at The Inn and Spa at Cedar Falls.”
- Image Slider: Add any relevant images for the slider. We recommend at least 6.
- Details tab: Set the “Details Title” as a high-level summary of the sale options, e.g. “Enjoy a 1,2, or 3-Weeknight Stay for Two With Our Voucher”
Add three sections:
What You Get, with the details of the sale
Amenities, with property/room amenities
The Fine Print, with the sale terms, conditions, and restrictions.
(*note: you can change the names of these as-needed to better fit the customer’s voice.) - Sales Settings tab:
Set the end date/time. We recommend setting the time to 11:59 PM on the final day of the sale.
Set “Sorry, this sale has ended” or similar in the “Expired Message” box. - Scroll down – in the Yoast section, make sure the meta title and description are compelling.
Until the sale is live, click the drop-down for “Allow search engines to show this Flash Sale in search results?” and set it to “No”.
Once you launch the sale, it is very important to change this to “Yes”.
WooCommerece “Processing Order” email
1. Check availability. Manually ADD WEBSITE URL.
2. Call the {site_name} to make your reservation. Manually ADD PHONE NUMBER.
3. Provide the voucher number when you make the reservation.
4. Print this email and take it with you when you check-in.
5. Enjoy an incredible getaway!
Content Creator Setup/HOW-TO
👉👉👉👉👉 CONTENT CREATORS: CLICK HERE FOR THE KEY ELEMENTS TO INCLUDE AND A STEP-BY-STEP HOW-TO.
LANDING PAGE EXAMPLES for the Offer
Examples from Beta Test (Countdown clock and “buy now” not available b/c offer has ended):
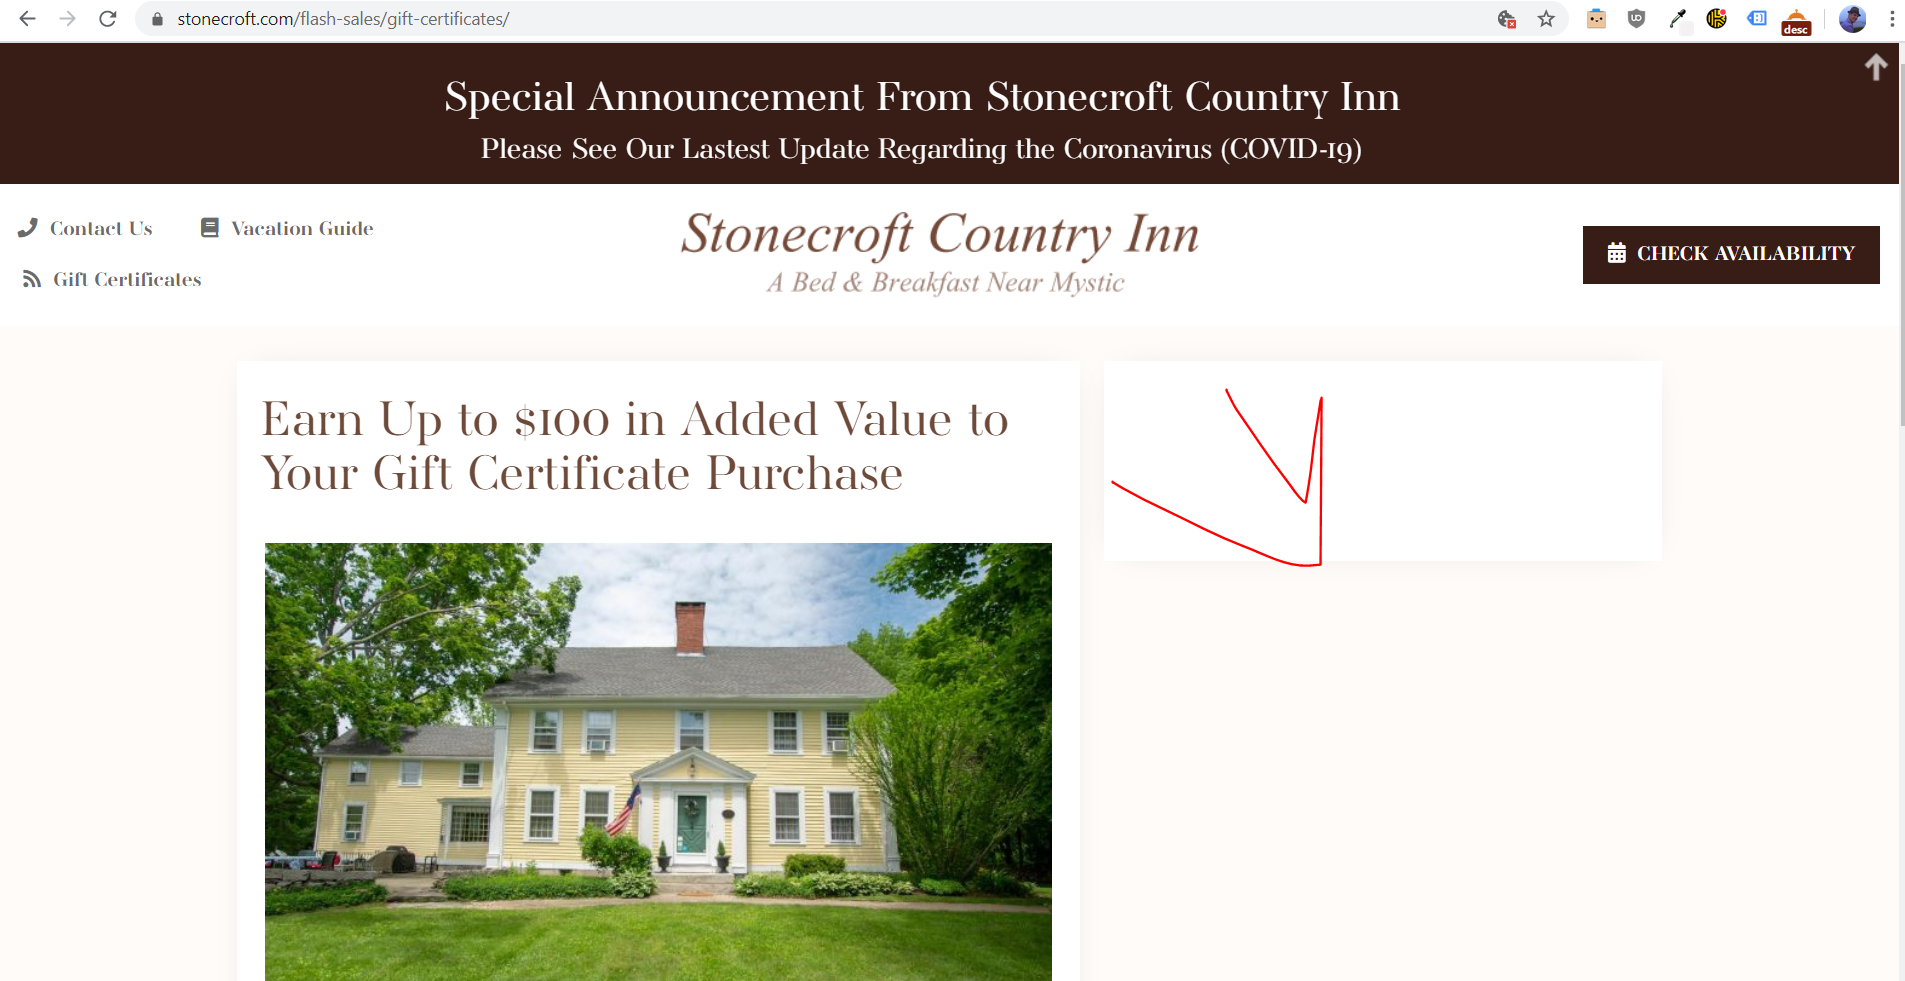
- Stonecroft Inn: https://stonecroft.com/flash-sales/gift-certificates (This is also an example of an extended sale)
- Red Sedona Vacation Rentals: https://redsedona.com/flash-sales/treat-yourself-save-up-to-1000/
- Inn & Spa at Cedar Falls (ORIGINAL FLASH SALE): https://innatcedarfalls.com/flash-sales/30-off-cottages
Sample Email Text and Visuals:
Stonecroft Country Inn
(These examples are from an Extended Sale, but the concept will be the same for an original series of emails.)
Inn & Spa at Cedar Falls (Original Q4Flash Sale)
- Day 1 Email: https://mailchi.mp/a504c3999dbc/first-flash-sale?e=e0f51b2ad4
- Day 2 Email: https://mailchi.mp/873b1da76720/second-flash-sale?e=e0f51b2ad4
- Day 3 Email: https://mailchi.mp/1d66c030c032/third-flash-sale?e=e0f51b2ad4
Sample Facebook Text and Visuals
Stonecroft Country Inn
Inn & Spa at Cedar Falls
- Day 1: Facebook Post
- Day 2: Facebook Post
- Day 3: Facebook Post
Troubleshooting
One Known Issue:
If Q4Flash Sale goes blank like below:
Re-Select the “Product Selection” in Flash Sales settings and click “Update”