How to Set Up a Pinterest Account
- Go to Pinterest for Businesses and make sure you are not logged in to another account already.
- Click Join Pinterest or Join as a business
- Enter the client’s email address (Get this from the CEM), create a password (keep it professional, such as client1 or similar) and click Sign up.Record the username (client’s email address) and password, use Q4Launch16, in Basecamp. Very important!!
- Enter account info – email, password, business name, website URL, and select Local Business as the business type.
- Click Create account
- Follow 5 topics (Ie: travel, city, state, photography, etc.)
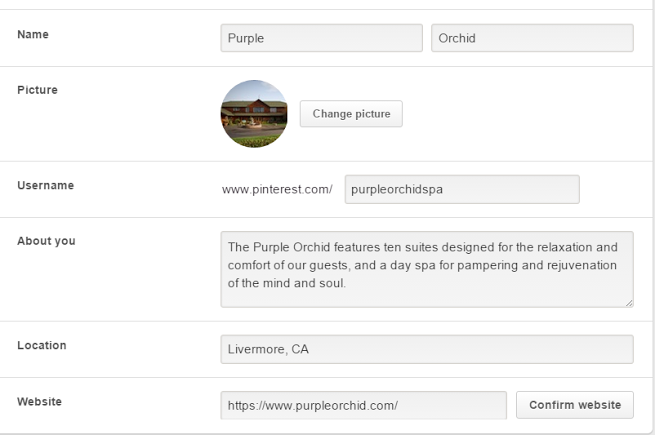
- Go to the PIN icon and select Edit Settings
- Scroll down and add a photo.
- Go to the client website and save a nice photo to your desktop. Then click Change Your Picture and upload that image. If it doesn’t fit, you’ll need to find a smaller image.
- Check the Username. Must be between 3-15 characters. If you are limited onspace, you can abbreviate, such as IsaiahJonesBnB instead ofIsaiahJonesHomestead. Just make sure it’s an accurate representation of the
business.
- Fill in the About You (Limited word count), Location, Website
- Click Save Settings
- Scroll down and add a photo.
- Go ahead and create several boards and add pins linking back to the website as much as possible. (Board examples: Isaiah Jones Homestead Blog, Things to Do in Sandwich, MA, Places to Stay in Sandwich, MA (only feature their website/rooms for this one), Things to Do in Sandwich, MA, etc.
- Copy/paste the Pinterest URL into Basecamp, along w/ the username and password.
- Now you’ll need to verify the account using the following instructions.
Verify a Pinterest Account
- Login to Pinterest.
- Go to Edit Settings
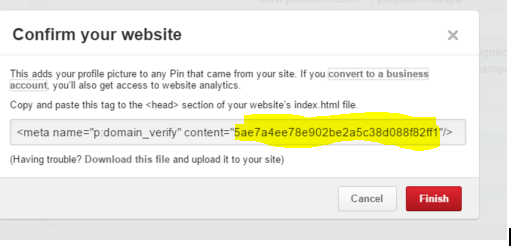
- Click Confirm Website.

- Copy the code that appears between the “quotation mars”.

- Login to the live site (This process only works if we are hosting the website)
- For Old Framework
- Go to Appearance > Customize > B&B Framework
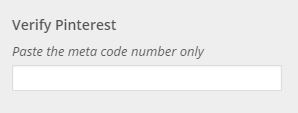
- In the box labeled “Verify Pinterest” paste the code copied from step 4 into this box.
- Click Save
- For New Framework
- Go to Appearance > Customize > Q4FWSite Options > Social / Pinterest Verification
- Paste the code copied in step 4 into the box labeled “Verify Pinterest”

- Click Save**If the site is a Dev Site, you can login, enter the number and save it, but you want to verify the live URL, not the dev.. so, wait on that part.
- For Old Framework
- Go back to Pinterest and click Finish or Save and Publish. You might still need to click Save Settings
- To verify that the code was added correctly, go to the homepage of the website and hit Ctrl + u on the keyboard (or Right-click on the homepage of the website, select View page source)
- While viewing the page source, hit Ctrl + f. In the search box type “domain_verify”

- This should find the code that was added for the Pinterest verification with the same code that you previously pasted in the quotations after content =

- Check this To Do off on Basecamp.
How to Convert a Personal Account to a Business Account
- Go to Pinterest for Business and make sure that you are not logged in to another account.
- Click Convert now
- Log in with the client’s email and password
- When you set up (or convert to) a business account, Pinterest suggests that you:
- Confirm your website – which you can do right away or later
- Add a Pin It button to your website – so users can pin content from your website
- Add a Follow button/widget to your website – so users can follow you directly from your websiteNote that you will lose the link to your Facebook Personal Profile when you convert to a business account, but you will keep all existing Followers/Follows, boards and Pins.
Note that you will lose the link to your Facebook Personal Profile when you convert to a business account, but you will keep all existing Followers/Follows, boards and Pins.
For More Information on the difference between a Personal Pinterest Account vs a Business Account click here.

